Embed a video on your website
To embed a video in a web page: open the media in Videas, click Embed, copy the code shown and paste it into your site. The player then appears right on your page, without the visitor leaving your site or creating an account.
No Videas account yet? The Host a video tool returns an embed code straight from the browser, with no sign-up — 2 GB and ten minutes per file, and the link lives for seven days. A free account makes it permanent without changing the address already pasted on your page.
The Embed button is distinct from Share: Share produces a link to a page hosted by Videas, Embed produces a snippet of code to paste into your page. The rest of this article covers the settings in the Embed window — method (Script or iframe), dimensions, inline or popover display — then how to paste the code into common CMSs.
Get the embed code
- Open the media (video, audio, image, document or collection) in your workspace
- In the action bar at the top, click Embed
- The Embed window opens with the instruction “Copy this code and paste it on your website”
- Click the code card — or Copy code — and the button switches to Code copied!
The window shows two cards you can copy in one click:
- the code card (HTML badge): the block to paste on your site — the one you will use in almost every case;
- the link card (Link badge): the raw player URL, useful when your tool only accepts URLs (see Notion below).
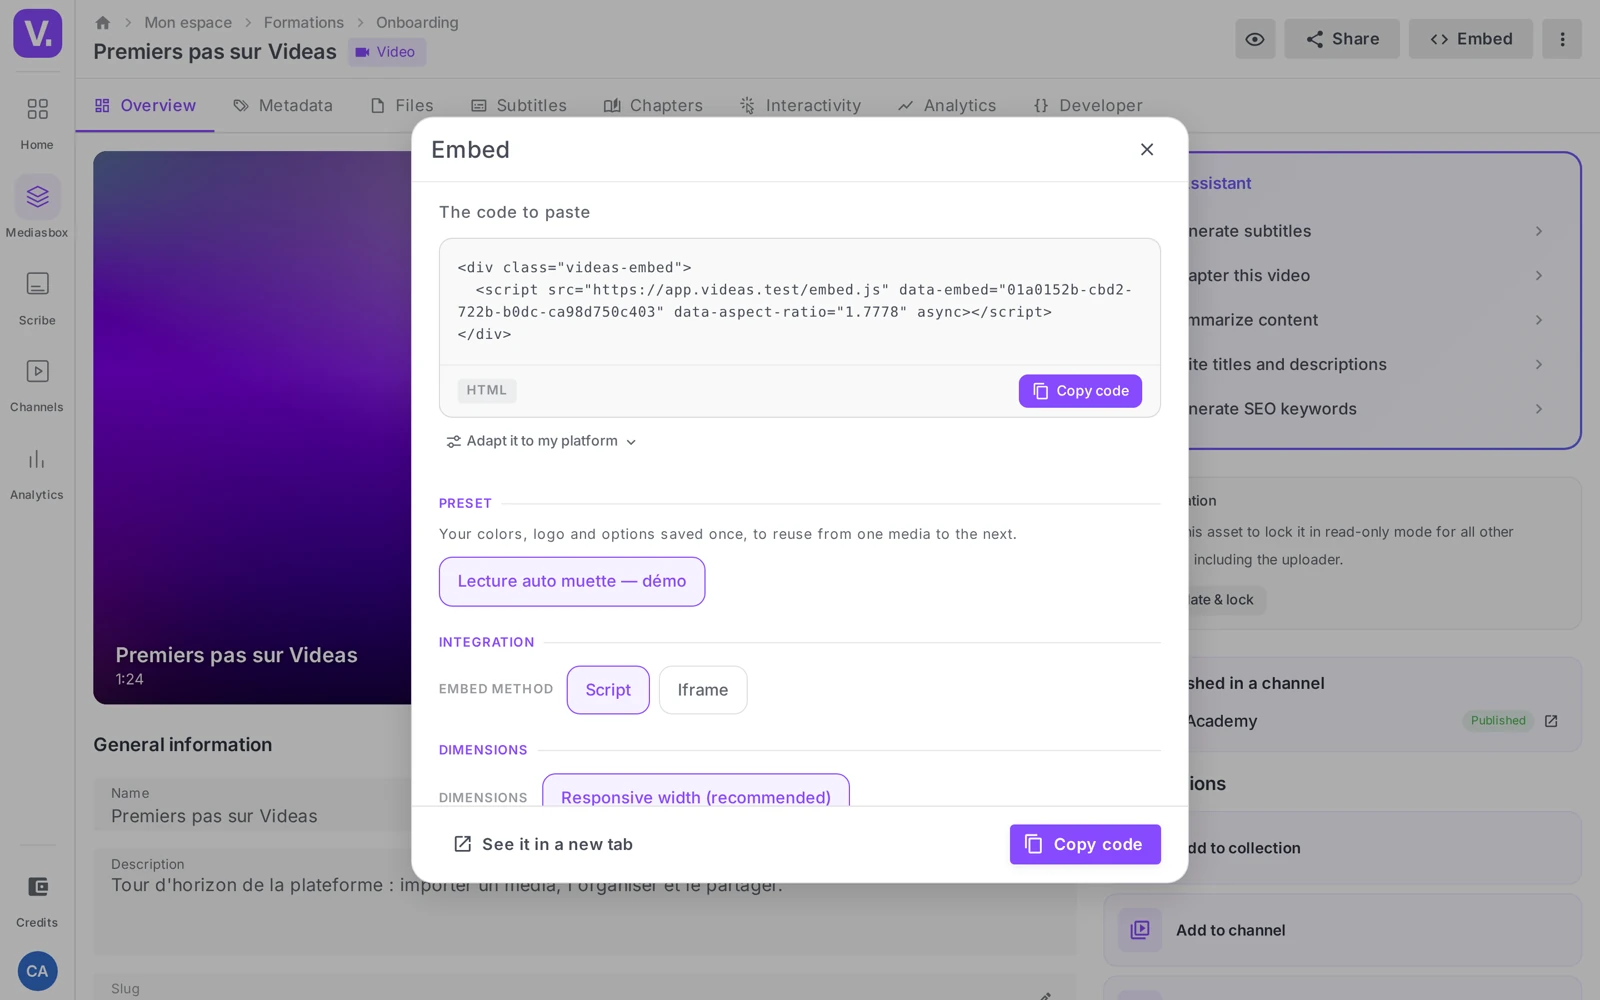
Choose the method: Script or iframe
The first option, Embed method, offers two buttons: Script (the default) and Iframe. The result looks the same; the difference is in how the player is loaded.
| Method | What it is | Use it when |
|---|---|---|
| Script (default, recommended) | A <script> tag that loads the Videas player. It resizes itself, updates automatically (new player features without re-copying), and can talk to your page. |
Your site accepts <script> tags: hand-written HTML page, WordPress (HTML block), Webflow. |
| Iframe | A self-contained <iframe> tag. The player is frozen at the version you copied; no dialogue with the page. |
Your tool forbids external JavaScript: Notion, Wix HTML blocks, company wikis, locked-down intranets. |
When in doubt, leave it on Script: that is the method that keeps itself up to date.
Set the display: inline or popover
With the Script method, the Display option offers two modes:
- Inline (default): the player appears directly in the page, where the code sits.
- Popover: the video only loads when a trigger is clicked, then opens fullscreen over the page. Ideal for lightening a page that holds several videos — nothing is loaded until the visitor asks for it.
In Popover mode, you choose the Trigger — a Button or a Thumbnail — and, for a button, its Button label (“Watch video” by default). The Preview link opens a preview of the popup so you can check the result before copying.
Set the dimensions
By default, the video uses Responsive width (recommended): the player takes up 100% of the width of its container and adapts to every screen, with no overflow. In that case you only pick a Format (aspect ratio) from the presets offered, or Custom to enter your own width/height ratio.
To force a fixed size (an insert in a narrow column, for instance), turn responsive mode off: two Width and Height fields in pixels appear. A collection opens slightly larger by default (640 × 600 px) to leave room for navigating between items.
Tip: keep responsive width unless your design calls for an exact dimension. That is what prevents black bars on mobile and horizontal overflow.
Set the playback options
The Options & playback section depends on the media type: a video offers Autoplay, Loop, Muted, Controls; an image offers zoom and fullscreen; a PDF document offers thumbnails and outline display; a collection offers autoplay next. The same settings, in full, are available in the Developer tab (see below).
Note: Autoplay is blocked by most browsers when sound is on. For a reliable start, turn on Autoplay and Muted — that is the combination that works everywhere.
Apply a preset
If your workspace or your organization has created presets (a saved combination of options and appearance), they appear in a Presets row at the top of the options. One click applies the preset to every option at once — handy for keeping the same presentation across all your embeds. See Customize the player’s appearance and create a preset.
The player in detail: the Player product page covers what the player carries — formats, chapters, subtitles, interactivity — and the demos show it running.
Share or Embed: what is the difference?
Share produces a link to a page hosted by Videas; Embed produces a snippet of code to paste into your own page, so the player appears on your site without the visitor leaving it.
The consequences do not stop there. A share link has its own analytics (opens, email funnel, revocation) and its own protections (password, expiry). An embed counts its plays in the video’s analytics and is protected by domain restriction, not by a password.
Script or iframe: which one?
Script by default: the player updates itself and resizes with its container. That is the choice for a plain HTML site, WordPress, Webflow or Squarespace.
Switch to Iframe when your platform filters JavaScript — that is the case with Wix, Confluence and most internal wikis and intranets. The result is the same; the iframe is simply fixed at the dimensions you declared. Notion is a special case, accepting neither: type /embed and paste the URL from the Link card.
Why doesn’t my video start automatically?
Because most browsers block autoplay with sound. That is a browser rule, not a Videas setting: turning on Autoplay alone is not enough.
The combination that works everywhere is Autoplay + Muted. The visitor turns the sound back on with one click if they want to — the compromise every video platform has settled on, for the same reason.
What does the orange “Copy the updated code” mean?
That you copied the code and then changed an option: what is pasted on your site no longer reflects your latest settings. The card turns orange as a safeguard.
It is the most common trap in video embedding — you set your options after pasting, and the live result never changes. Click Copy code again, then replace the code on your page. Never paste an embed while an orange indicator is showing.
When should I use Popover mode?
When a page holds several videos. In Inline mode every player loads with the page; in Popover mode nothing loads until the visitor clicks the trigger — the video then opens full screen over the page.
You choose the trigger: a Button (with its label, “Watch the video” by default) or a Thumbnail. The Preview link shows how the popup will look before you copy the code.
Where do I see plays from an embedded video?
In the video’s analytics — the Analytics tab on its page, or the Analytics application. Plays coming from an embed are counted like any other, with no distinction.
There is no per-embed dashboard. If you need to know which sites your videos are watched on, the Traffic sources tab in your analytics answers that, listing domains and exact URLs.
Going further: the Developer tab
Right at the bottom of the window, the Advanced options card reads “All customization settings on the Developer tab” and opens the media’s Developer tab. There you will find every player setting (chapters, picture-in-picture, eco mode, starting at a precise moment, and more), a live preview, preset management and the technical IDs. See Fine-tune an embedded player for a full tour of that tab, and Customize the video player for the look.
Watch out for stale code
If you copy the code, then change an option afterwards, the code card turns orange with the note Copy the updated code. It is a safety net: what is pasted on your site no longer reflects your latest settings. Click Copy code again to get the current version, and replace the code on your page.
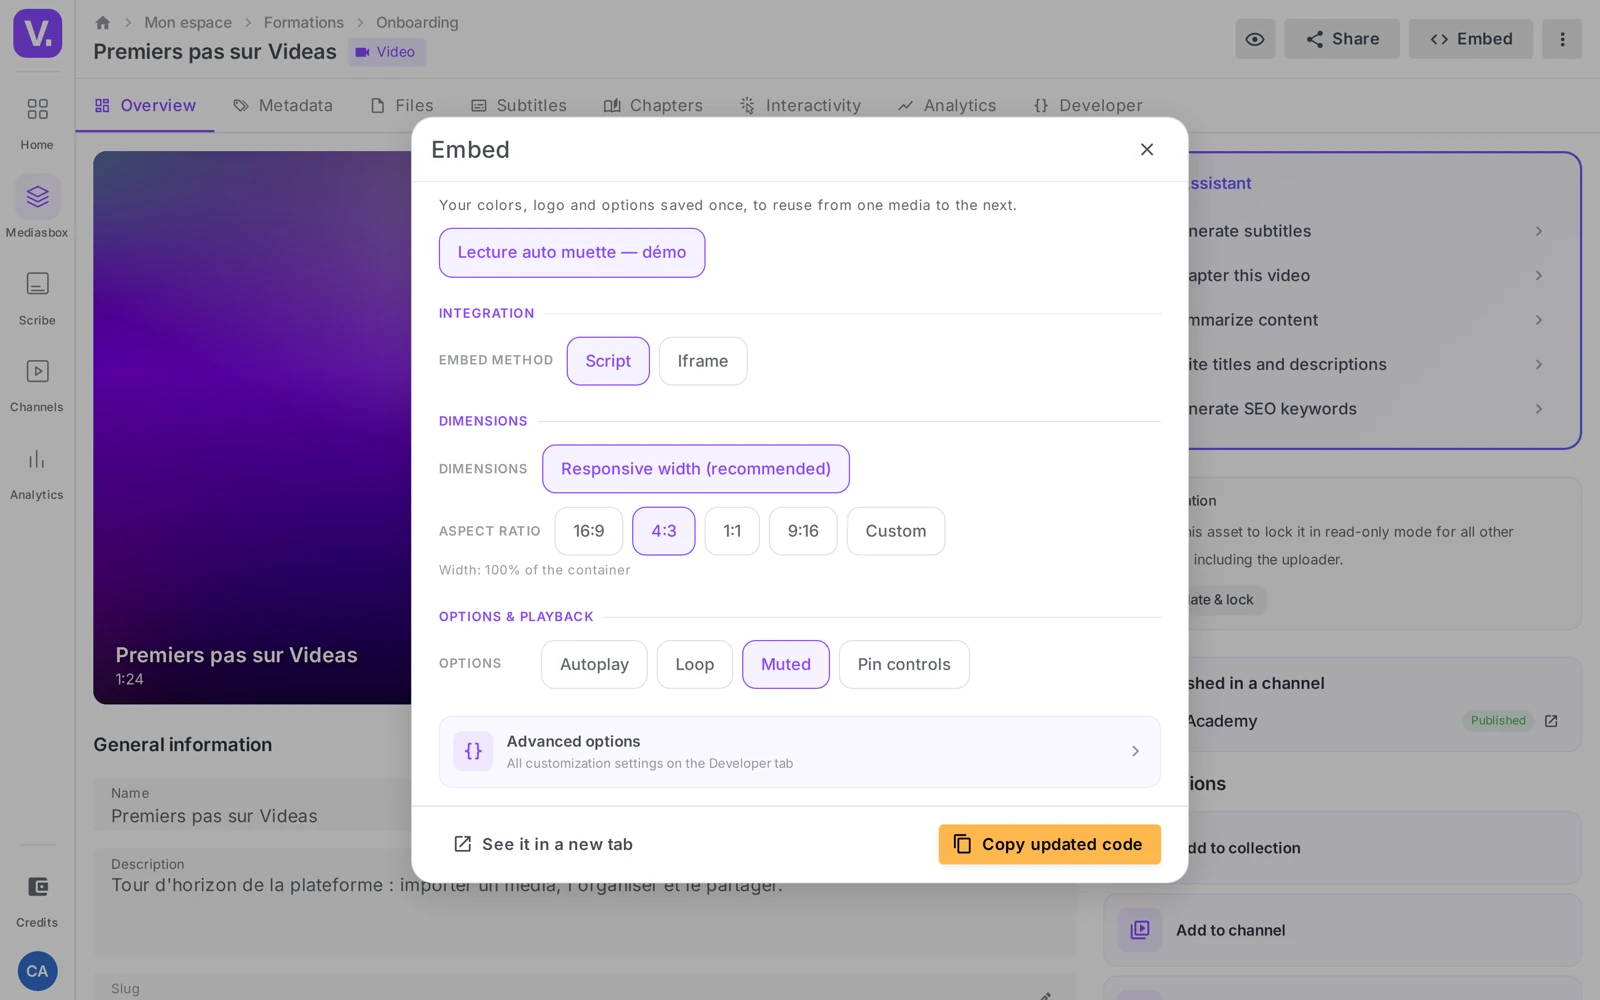
Remember: never paste an embed before checking that no orange indicator is showing. It is the most common trap: you set your options after pasting, and the live result does not change.
Paste the code on your site
The Script method suits any site that accepts <script> tags; otherwise, switch to Iframe in the Embed window.
- Hand-written HTML page: paste the code where you want it inside the
<body>. - WordPress: add a Custom HTML block (Gutenberg editor) or switch to Text mode (classic editor), then paste.
- Webflow / Squarespace: add an Embed element (or Code block) and paste the code.
- Wix: add a Custom HTML element; Wix often blocks external scripts, so prefer the Iframe method.
- Notion: type
/embed, then paste the URL from the Link card (Notion does not accept<script>). - Internal wikis (Confluence, intranets): prefer the Iframe method, most of them filter out JavaScript.
Once pasted, test the final page: does it show in the right place, does it play (sound, fullscreen), and how does it behave when you resize the window and on mobile. If the player does not show, check the browser console, any blocker, or switch to the Iframe method.
Customize and secure your embeds
- To change the player (colors, logo, options, presets): Customize the video player.
- To let only your site display your videos: Restrict the domains allowed to embed your videos.
- To embed a whole playlist: Embed a collection of videos on your site.
Setting player options or saving a preset requires the Editor role on the workspace; domain restriction is set at workspace level and requires the Admin role.
Track views on your embedded videos
Plays on your embedded videos are counted like any other: you will find them in the video’s analytics (the Analytics tab on the media page) and in the Analytics app. There is no dashboard dedicated to one particular embed. See View a video’s analytics.
That is different from a share link, which does have its own analytics (opens, views, email funnel) — see How to share a video with a link.
In short
- Embed (distinct from Share) gives you code to paste on your own site; the visitor needs no account
- Script method (recommended, updates and resizes itself) or Iframe (works everywhere, frozen)
- Inline or Popover display (loads on click, fullscreen)
- Responsive width by default (100% of the container) or fixed dimensions in pixels
- An orange Copy the updated code indicator flags stale code — re-copy before pasting
- Full settings, live preview and presets in the Developer tab
Related articles
Screenshots were taken on Videas Academy, an example channel built for this help center. It belongs to a fictional customer, not to Videas: your own channel carries your name, your branding and your prices.