Fine-tune an embedded player
A media item’s Developer page carries the settings the simple embed code does not offer: start at a precise timecode, enforce a theme and a logo, save a reusable preset, or wire up the API. Open the media, then the Developer tab.
The preview there is live: you see the effect of every setting before copying the code. The simple embed covers the essentials — see Embed a video on your website; this page covers the rest.
What you need
- A published media item in Videas
- The Editor role or higher on the workspace
- (recommended) Having already set up a simple embed — see Embed a video on your website
Step 1: Reach the Developer page
Two ways in:
- From the Embed modal: right at the bottom, click the Advanced options card (
<>icon) - Directly: on the media page, go to the Developer tab
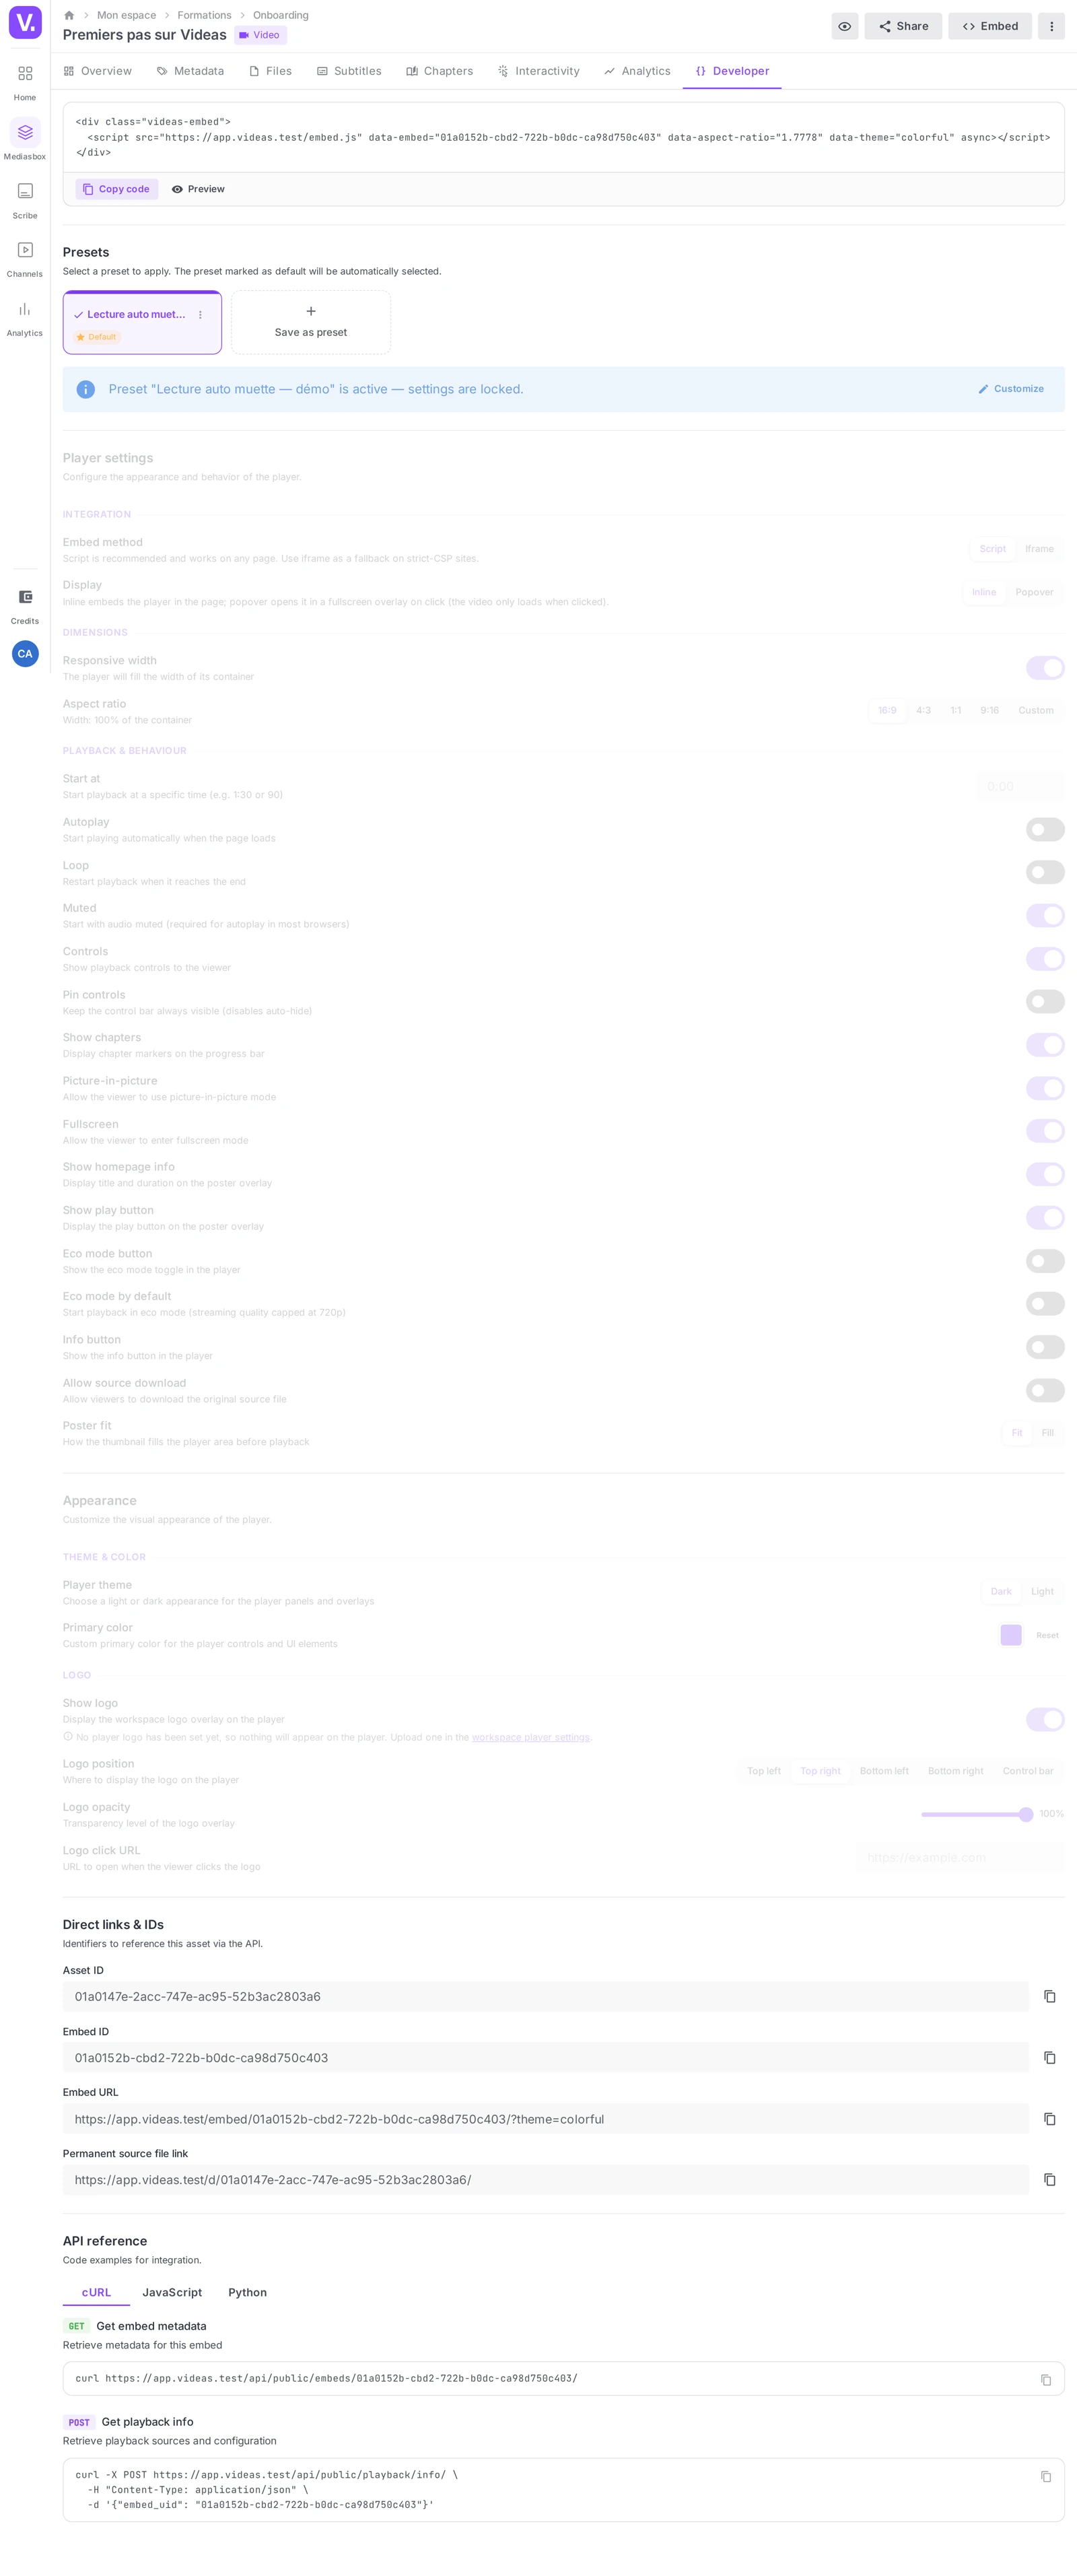
The page opens with, from top to bottom, the Embed code, Presets, Player settings, Appearance, Direct links and IDs and API reference sections.
Step 2: Embed code with live preview
At the top of the page, a code block shows the HTML snippet ready to copy — identical to the one in the Embed modal, but updating in real time as you change the options below.
Live preview
The Show preview button (eye icon) unfolds a working player configured exactly like your final snippet. Very useful for:
- Checking the effect of an option (autoplay, theatre mode, logo position) without pasting into your site
- Testing a preset before putting it into production
- Adjusting the primary color or the logo position and seeing the result immediately
The “Stale code” indicator
If you copied the code, then changed an option afterwards, the block turns orange with the note “Copy the updated code”. That way you know what is on your site is no longer in sync with the current options.
Step 3: Manage embed presets
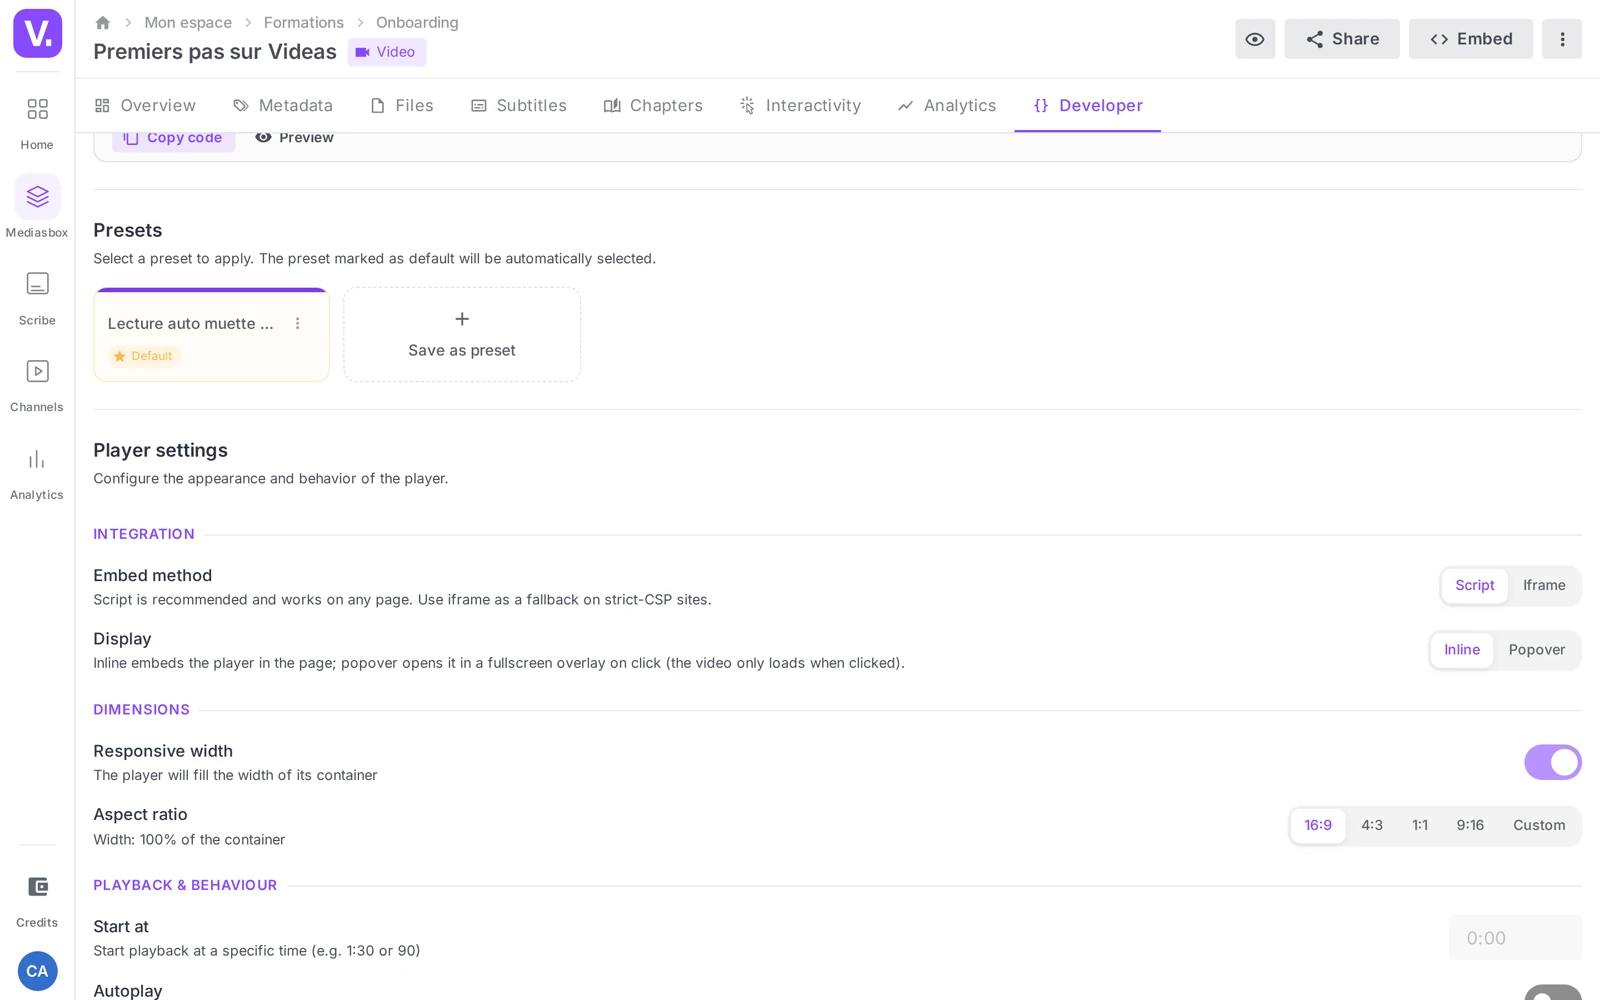
Presets let you freeze a combination of options reusable across every embed in the workspace or the organization. It is the tool that guarantees visual consistency and saves you re-configuring each embed by hand.
Apply a preset
Click a preset’s card: every player option lines up with it. A blue banner appears: “Preset [name] applied — the options are locked read-only”.
Customize a preset in place
Click Customize in the banner: you enter edit mode. An orange banner signals that you are editing the preset. Confirm your changes to save them.
Save a new configuration
Click the Save as preset card (+ icon). A dialog opens:
- Name: descriptive (for example “Light + autoplay muted — landing page”)
- Scope:
- Workspace: preset available only in this workspace
- Organization: preset shared with every workspace in your organization (organization Admin role required)
- Set as default (checkbox): this preset will be applied automatically to any new embed in the chosen scope
Promote a preset from workspace to organization
On a workspace preset (Workspace badge), the 3-dot menu offers Promote to organization: it becomes available to every workspace. Handy when a preset used by one team turns out to suit everyone.
Set as default / delete
The 3-dot menu also offers:
- Set as default preset (orange star badge) — applied automatically to any new embed
- Remove default if one is already set
- Delete the preset
Note: if customization is locked by the admin — an information message appears: “Customization is locked by your administrator. Only the available presets can be applied.” You can no longer set the options by hand, only pick from the published presets.
Step 4: Advanced player settings
A section for the options that do not appear in the simple Embed modal.
Start at (timecode)
The Start at field (video and audio only). Enter a timecode (MM:SS or HH:MM:SS, for example 2:30): playback will begin at that moment on load.
Use case: creating an embed on a specific passage of a long video (a testimonial at 12 in a one-hour conference), without editing the source video.
Start page (PDF)
The Start page field (PDF documents only). The page number to show on load (1, 2, 3 and so on). Ideal for pointing at a specific chapter of a long document.
Slideshow duration (image)
The Slideshow duration field (images only). A value in seconds (1-60), how long each image is shown before moving to the next.
Poster fit (video)
A choice between two modes for the preview thumbnail shown before playback:
- Contain (default): the thumbnail is fully visible, with bars if needed
- Cover: the thumbnail fills the whole area, with possible cropping
Display mode (video collection)
Three options: Drawer, Bottom Bar and Sidebar. See Embed a video on your website for how to use them.
Autoplay warning
If you turn on Autoplay without turning on Muted, an inline visual warning appears next to the toggle: “Most browsers block autoplay with sound. Turn on muted mode as well for a reliable start.” It is a safety net against the most common mistake in web video embedding.
Step 5: Appearance
The section dedicated to the player’s visual identity. Configurable per embed, but ideally frozen in an organization preset for consistency.
Theme
- Video, collections, documents: a choice between Dark (default) and Light
- Audio: three choices — Light, Dark, Colored (taken from a dominant color of the cover art)
Primary color
A color picker (HEX selector) for the accent color (buttons, progress bar, active icons). Set it to your brand’s official color (for example #1A73E8 for a corporate blue).
A Reset button returns to the default Videas color (purple).
Logo
The Show logo toggle overlays your logo on the Videas player. When on, sub-options appear (video only; images and documents are automatically pinned bottom-right):
- Position: 4 corners (top-left, top-right, bottom-left, bottom-right)
- Opacity: a 0-100% slider (typically 60-80% for a discreet effect)
- Click URL: the external link opened when the visitor clicks the logo (your site, your LinkedIn page and so on)
Accent color (audio)
A color picker specific to the audio player, for the waveform and the interactive elements.
Step 6: Direct links and IDs
The section that brings together the 4 copyable technical IDs, useful for custom integrations.
| ID | What it is for |
|---|---|
| Asset ID (UUID) | The stable identifier of the Videas media item. Use it in any script that references the media (analytics, custom integration, API calls) |
| Embed ID (UUID) | The identifier of the current embed configuration. Different from the Asset ID — one media item can have several embeds with different configurations |
| Embed URL | The direct src URL, usable as the value of an HTML iframe’s src attribute |
| Source download URL (if enabled) | A direct link to the source file (video, audio, original image). Useful for batch scripts or integrations that need the raw file, not for public delivery |
Remember: do not share the source download URL in public contexts. It is a direct link to the original file, bypassing the player’s protections (password, share expiry and so on). Keep it for internal scripts and explicitly authorized contractors.
Step 7: API reference
The page includes API examples ready to copy in 3 languages:
- cURL (terminal, shell scripts)
- JavaScript (Node.js, frontend)
- Python (back-end scripts, automation)
Two endpoints documented directly with your assetId:
GETGet the embed metadata — to display the options dynamically or deliver through a custom integrationPOSTGet the playback URL — to generate a stream on demand in an authenticated context
For the full API detail (tokens, scopes, other endpoints, error handling) see:
- Access the Videas API (developers)
- The Videas API documentation (interactive, always up to date)
Best practices
Prefer presets over ad-hoc configurations
If you publish more than 5 embeds, create a preset from the second one on. You will save time on every new embed and guarantee your site’s visual consistency. Promoting from workspace to organization is valuable when a format turns out to suit your whole operation.
Document the preset in its name
“Preset 1” is useless. Prefer “Light + autoplay muted — product landing page” or “Dark + bottom-left logo + corporate accent — testimonial embeds”. The name should be enough to know where and why to use that preset.
Test with the live preview before copying
The live preview saves you from pasting a badly configured embed on your site, spotting the problem in production, and coming back to fix it. Always check the preview before a deployment — especially for the visual options (color, logo, theme).
Change a default preset carefully
The default preset applies to every new embed in the scope. If you change it along the way, existing embeds keep their configuration (they do not update automatically). But every new embed created after the change will use the new default.
Secure your API usage
The API examples shown use authentication tokens. Follow good management practice: one token per integration, minimal scopes, regular rotation. See Access the Videas API (developers) for the full procedure.
How do I embed a specific passage of a long video?
With the Start at field in the Player settings section, on the Developer page. Enter a timecode in MM:SS or HH:MM:SS format (say 12:45): playback will begin at that moment when the embed loads.
That saves you cutting the source video to quote one testimonial in the middle of an hour-long conference. The same idea exists for other media types: Start page for a PDF, Slideshow duration for an image.
Asset ID and Embed ID: what is the difference?
The Asset ID identifies the media item itself, stably — that is the one to use in an analytics script, a custom integration or an API call. The Embed ID identifies one embed configuration: a single media item can carry several embeds with different settings, and therefore several Embed IDs.
Remember the rule: if your code is about the media, take the Asset ID; if it is about one particular display, take the Embed ID.
Can I circulate the source download URL?
No, not publicly. It is a link straight to the original file that bypasses the player’s protections — password, share expiry and domain restriction have no effect on it.
Keep it for internal scripts and explicitly authorised suppliers. For public distribution, use the embed code or a share link, which stay revocable.
At how many embeds should I create a preset?
At the second one. A preset freezes a reusable combination of options and saves you reconfiguring each embed by hand — that is what keeps all your players looking alike.
A preset is saved at workspace or organization level, and can be promoted from one to the other when it proves useful beyond its original team. Name it so it picks itself: “Light + autoplay muted — product landing page” beats “Preset 1”.
Does changing the default preset update existing embeds?
No. Embeds already pasted keep their configuration: the new default applies only to embeds created after the change.
That is cautious, but it means a visual refresh does not propagate by itself — you have to copy the code again on the pages concerned. Plan for that before changing a default applied across the whole organization.
Why can’t I set the options by hand any more?
Because an administrator has locked customization. The message “Customization is locked by your administrator” then appears, and you can only choose from the published presets.
That is a deliberate setting, meant to guarantee a consistent visual identity. To get a variant, ask an Admin in your organization to publish an extra preset rather than trying to work around the lock.
In short
- A media item’s Developer page (dedicated tab, or the Advanced options button in the Embed modal) brings together 5 sections: embed code with preview, presets, player settings, appearance, direct links and IDs, API reference
- Live preview: see the result before pasting into your site
- Presets: save at workspace or organization scope, set a default, promote a workspace preset to organization level, mark with a star
- Advanced settings unique to this page: Start at (timecode), Start page (PDF), Slideshow duration (image), Poster fit (video)
- Appearance: themes (light/dark, plus colored on audio), primary color via a color picker, logo (position, opacity, click URL)
- 4 copyable technical IDs: asset ID, embed ID, embed URL, source download URL (keep it for internal scripts)
- Built-in API reference: cURL, JavaScript and Python examples with your
assetId; for the detail of tokens and scopes, see the dedicated API article
Related articles
Screenshots were taken on Videas Academy, an example channel built for this help center. It belongs to a fictional customer, not to Videas: your own channel carries your name, your branding and your prices.