Customize the video player
To customize a video’s player: open the media, go to the Developer tab, then set the options in the Player settings section. A live preview shows the result on every change. When a configuration suits you, you can save it as a preset to reapply it in one click to all your other media.
This article covers the player’s behaviour (controls, autoplay, chapters, eco mode capped at 720p and so on) and the mechanics of presets. For the appearance (colors, logo, theme), see Customize the player’s appearance and create a preset.
Open the Developer tab
Two ways lead to the same screen:
- on the media page, click the Developer tab;
- or, from the Embed window, click the Advanced options card at the bottom.
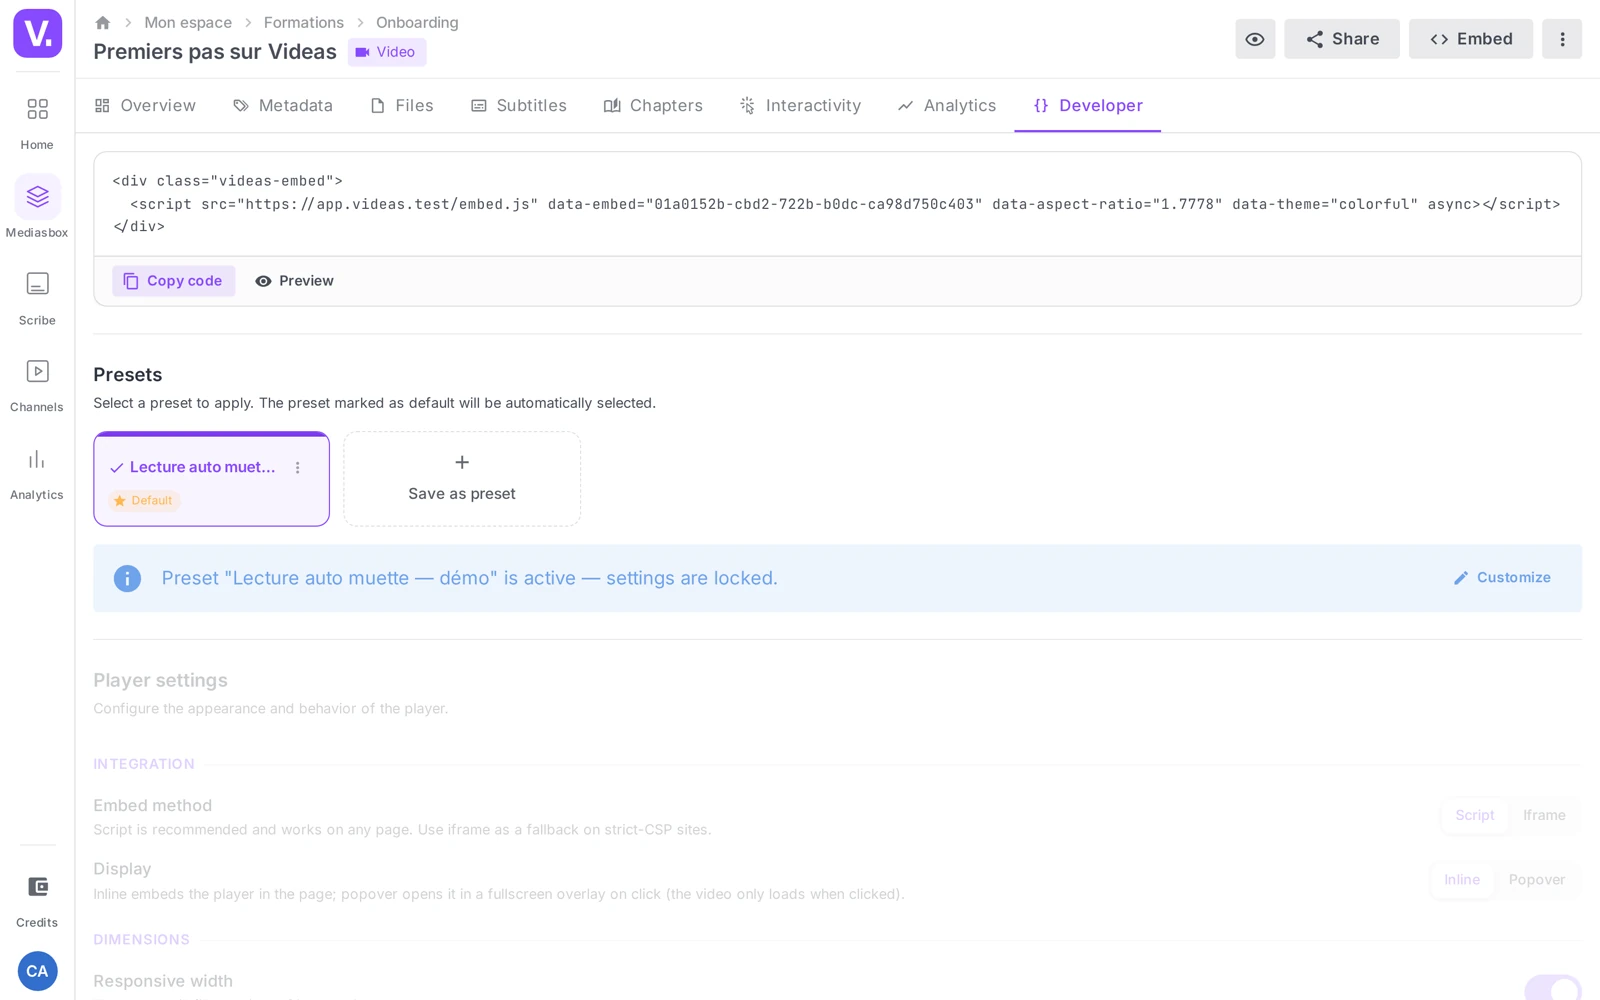
The screen stacks several sections: the embed code with its preview, the Presets, the Player settings, the Appearance, the Direct links and IDs, and an API reference. Click Preview to show a working player right under the code: it updates as you go, which saves you from pasting a badly configured embed on your site.
Set the player options
The Player settings section — “Configure the player’s appearance and behaviour” — shows the settings relevant to the type of media you have open.
For a video:
- Autoplay — start on its own when the page loads
- Loop — go back to the start when it ends
- Muted — start with no sound (required for reliable autoplay)
- Controls — show the control bar to the viewer
- Always show controls — keep the bar visible at all times
- Show chapters — chapter markers on the progress bar
- Picture-in-picture — allow the floating mini-window
- Fullscreen — allow switching to fullscreen
- Show info / Show play button — title, duration and button on the thumbnail
- Info button — an information button inside the player
- Source download — let the viewer retrieve the original file
- Start at — begin playback at a precise moment (e.g.
2:30), without editing the video - Poster fit — Contain (whole thumbnail, with bars if needed) or Cover (fills the area, with possible cropping)
Note: if you turn on Autoplay without Muted, a warning appears next to the setting — most browsers block autoplay with sound. Turn on Muted for a reliable start.
Other media types have their own options: audio offers Shuffle, Show waveform and Show playlist; an image offers Enable zoom and Allow download; a document offers Show thumbnails, Show outline, Enable search and a Start page; a collection offers Autoplay next and, for video collections, a Display mode (Default, Bottom bar or Sidebar). See Embed a collection of videos on your site for those options.
Eco mode
Two settings, specific to video, concern eco mode (which caps streaming quality at 720p to save bandwidth):
- Eco mode button — show the button in the player so the viewer can turn it on themselves (on by default);
- Eco mode by default — start playback in eco mode straight away (off by default).
There is no playback-speed setting and no forced quality selector: the choice of quality belongs to the viewer, in the player (see Understanding encoding and streaming qualities).
Save a reusable preset
A preset freezes a complete player configuration (options + appearance) so you can apply it in one click to other media — essential for keeping a consistent presentation without re-setting everything each time.
A preset can only be created from a media item’s Developer tab (never from the settings):
- Set the options you want
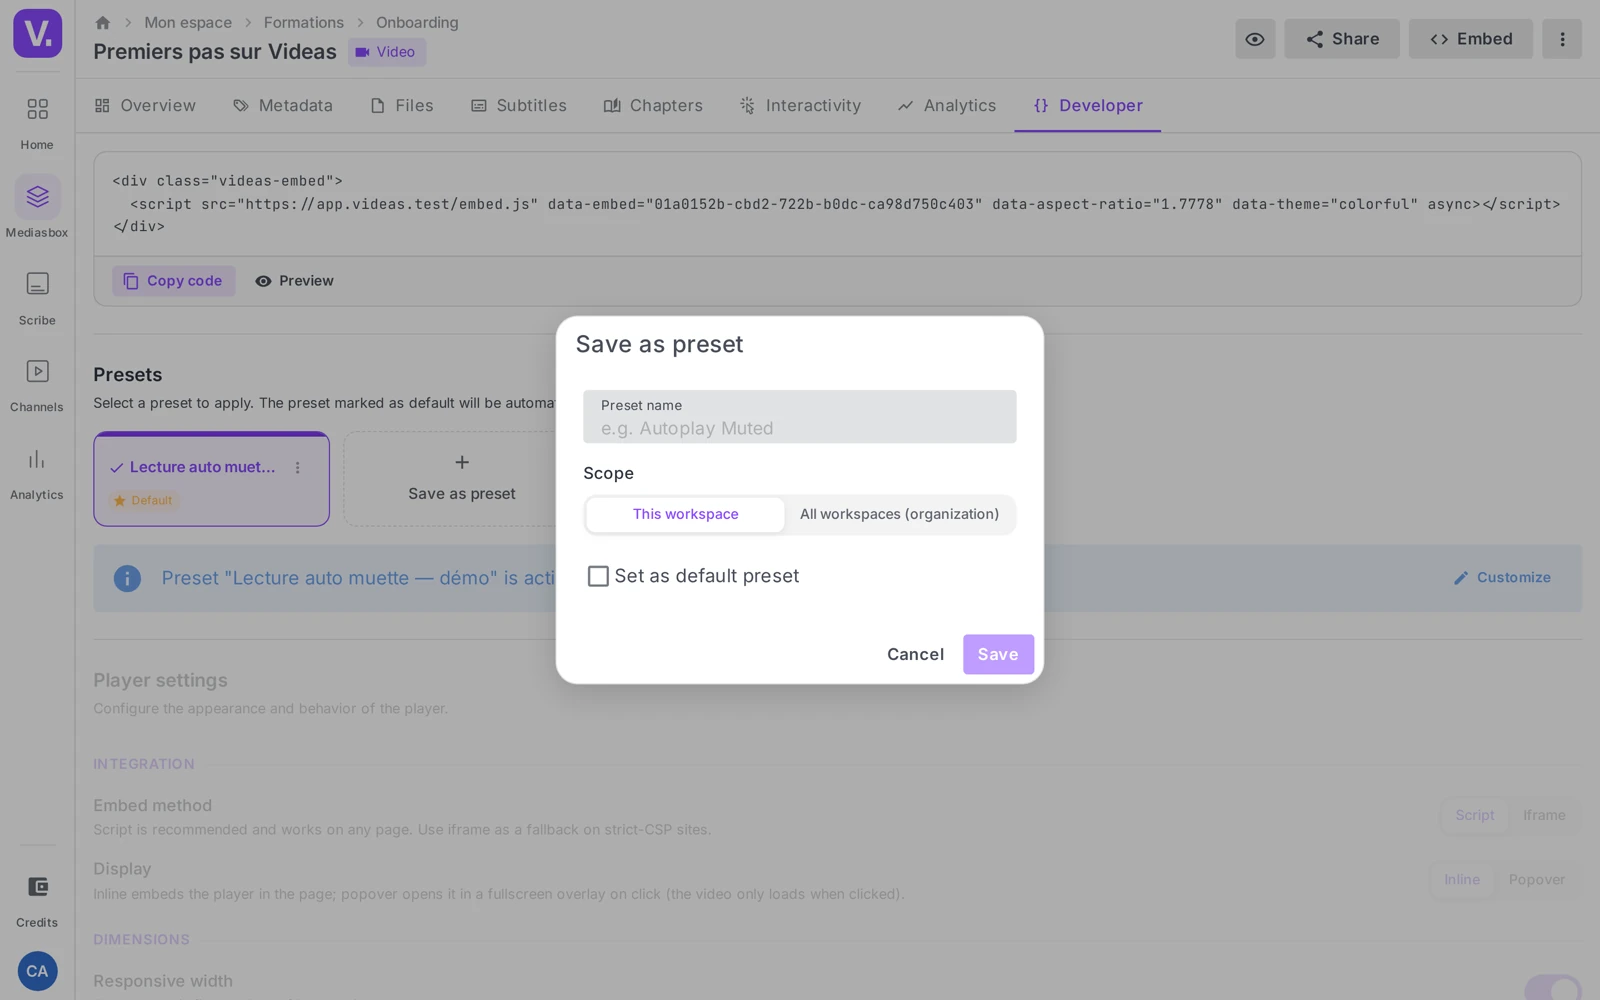
- Click the Save as preset card
- In the Save as preset dialog, fill in:
- Preset name (e.g. “Muted autoplay”)
- Scope: This workspace or All workspaces (organization)
- Set as default preset — to apply it automatically to new media of the same type
- Click Save — a “Preset saved” message confirms it
A default preset applies automatically to new media of its type; if a default exists both for the workspace and for the organization, the workspace one wins.
Apply and edit a preset
Clicking a preset’s card applies it and locks the options: a banner reads “Preset ‘{name}’ active — the settings are locked”. To start from that preset and adjust it, click Customize: an “Editing preset…” banner appears, and you save your changes with Save preset.
Each preset’s ⋮ menu offers Set as default / Remove default, Rename, Share with all workspaces (for a workspace preset) and Delete.
Manage your presets and the default logo
Your list of presets is managed from the settings, at two levels.
- At workspace level: Workspace settings → Embedding section → Media players. There you will find the workspace’s Player logo, the customization lock, and the Embed presets list.
- At organization level: Organization settings → Media players. There you set the default Player logo for the whole organization and the shared presets.
In the Embed presets list, tabs filter by type (All / Video / Audio / Image / Document / Collection). Each preset carries a Default or Organization badge where relevant, and is managed with the Share with all workspaces / Restrict to this workspace actions, setting as default, or deleting. If the list is empty, a message reminds you where to create a preset: “Create a preset from the Developer tab on any file.”
Lock customization
To enforce a strict brand style (a corporate channel, an educational media library), a workspace administrator can turn on the Lock player customization setting under Media players. Users can then no longer change the options or create presets — only apply the existing presets. The Developer tab then reads “Player customization is locked. Contact the workspace administrator to change the presets.” Workspace administrators are not affected by this lock.
Technical IDs and API
The Direct links and IDs section brings together the copyable identifiers useful for custom integrations: Asset ID, Embed ID, Embed URL, and Source file download URL.
Careful: the Source file download URL points straight to the original file and bypasses the player’s protections. Do not publish it — keep it for internal scripts.
The API reference section offers ready-to-copy examples (cURL, JavaScript, Python) for two calls — Get embed metadata (GET) and Get playback info (POST). To create a key, learn about scopes and read the full documentation, see Access the Videas API (developers).
Who can customize the player
- Setting a media item’s options and saving a preset: the Editor role on the workspace (permission to edit files).
- Managing workspace presets, the default logo and the lock: the Admin role (workspace management permission).
- Organization-level settings (organization logo and presets): organization settings management.
See each option in action: the player demos offer one page per setting — chapters, playlist, waveform, themes.
Where is a preset created?
Only from a media item’s Developer tab, never from the settings. Set the options you want, then click the Save as preset card: you pick a name, a scope (this workspace or the whole organization) and, if you wish, the Set as default preset box.
The settings — Workspace settings → Embedding → Media players — are then there to manage the list: share a preset with all workspaces, set it as default, delete it. That is also what the message shown when the list is empty reminds you.
Workspace or organization: which scope for a preset?
Organization for your main brand style, the one all your embeds should follow. Workspace for local cases — an event microsite, a client with different colours, an experiment.
If a default preset exists at both levels, the workspace one wins. A workspace preset that turns out to be useful elsewhere can be promoted with the Share with all workspaces action, without recreating it.
Why are my player options locked?
Two possible causes. Either you applied a preset: a banner then reads “Preset ‘{name}’ active — settings are locked”, and the Customise button hands control back so you can adjust and save.
Or an administrator turned on Lock player customization in the workspace settings. You can then only apply existing presets. That lock does not apply to workspace administrators; to get a variant, ask them to publish an extra preset.
Can I force a playback speed or a quality?
No. There is no speed setting and no forced quality selector: the choice of quality belongs to the viewer, in their player.
What you control is eco mode, which caps streaming at 720p. Two separate settings: Eco mode button shows the button so the viewer can turn it on themselves (on by default), and Eco mode by default starts playback in eco mode straight away (off by default).
Why do the available options change from one media item to another?
Because the Player settings section only shows the settings relevant to the media type you opened. A video offers autoplay, loop, chapters, picture-in-picture; an audio item offers shuffle, waveform and playlist; an image offers zoom and download; a document offers thumbnails, table of contents, search and start page; a collection offers autoplay next and, for videos, a display mode.
That is also why the preset list is filtered by type in the settings: a preset applies to the media type it was created on.
In short
- The player is customized in a media item’s Developer tab, with a live preview
- The Player settings section offers options matched to the media type; eco mode caps quality at 720p
- A configuration is saved as a preset (workspace or organization scope, with a default option) — created from the Developer tab only
- The list of presets and the default logo are managed under Settings → Media players, at workspace and organization level
- The Lock customization setting restricts users to the existing presets
- Customizing a media item = Editor; managing workspace settings = Admin
Related articles
Screenshots were taken on Videas Academy, an example channel built for this help center. It belongs to a fictional customer, not to Videas: your own channel carries your name, your branding and your prices.