Add chapters to your videos
To add chapters to a video, open its detail page in the media library, then the Chapters tab. You can create them in three ways — manually one by one, automatically with AI from the transcription, or by importing from the clipboard. Well-placed chapters turn a long video into navigable content, where the viewer jumps straight to the passage they care about — count on one chapter every 2 to 5 minutes on a tutorial.
You need the Editor role or above on the workspace (the Edit content permission) and a video that has already been uploaded. AI generation also requires an available transcription (Videas analyzes media containing speech automatically on upload).
See it in action: the Chapters and transcript demo shows how chapters look on the viewer’s side (markers on the timeline, navigation panel, search).
Step 1: Open the chapter editor
From your media library:
- Open the detail page of the media item (click its thumbnail)
- Click the Chapters tab
The editor opens with a banner that depends on the state of the audio analysis (see step 3), the list of existing chapters below it, and, at the very bottom, a clipboard import box.
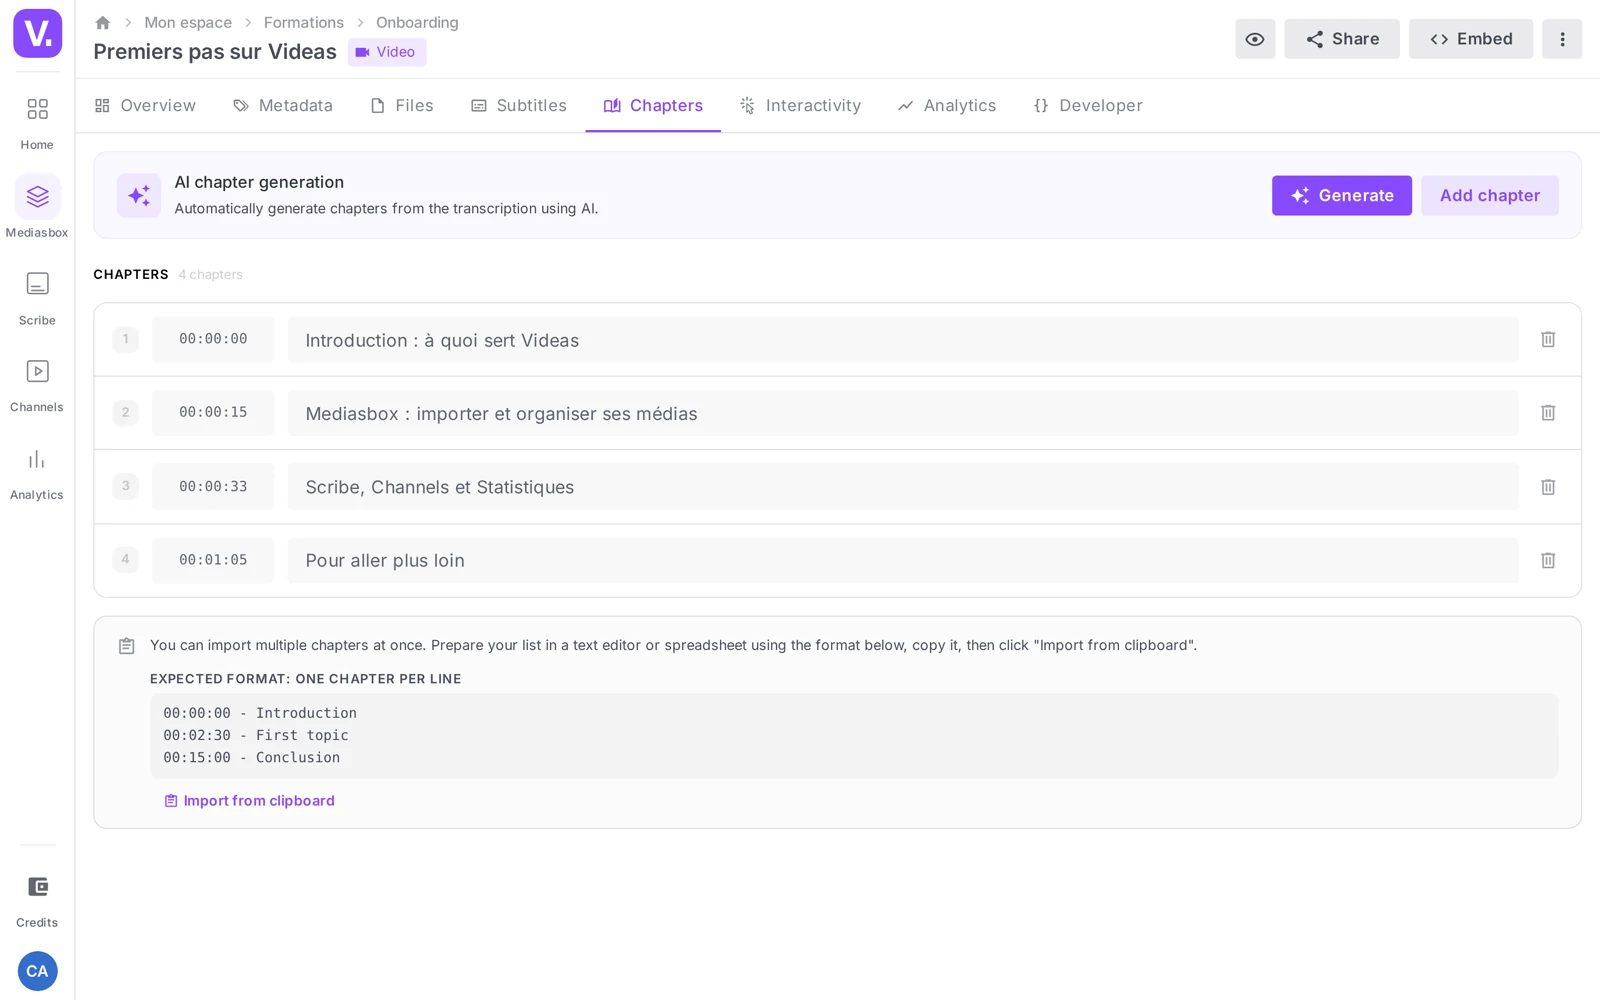
Step 2: Add a chapter manually
This is the most direct route when you already know where you want to place the markers.
- Click Add a chapter (button at the top right of the banner)
- A new row appears in the list, with two fields:
- Timecode in
HH:MM:SSformat (for example00:02:30) - Chapter name (for example “Introduction”, “Hands-on demo”, “Q&A”)
- Timecode in
- Enter your values; the timecode is reformatted automatically when you leave the field
- Repeat for each chapter
- Click Save in the bar that appears at the bottom of the screen
Tip: open the video in a window alongside to spot the key transitions and note their timecodes as you watch, then come back to the editor and enter them all at once.
Step 3: Generate chapters with AI
Videas can generate chapters automatically from the transcription of your media using AI. The feature works in stages.
Understanding the banner
At the top of the Chapters tab, a banner shows the state of your media’s audio analysis:
| State | What it means | What to do |
|---|---|---|
| Analysis required | The media has not been analyzed for speech yet | Click Analyze to start the analysis |
| Analysis in progress | The analysis is running in the background (a few minutes) | Wait |
| Analysis failed | The analysis failed (unreadable audio, unusual format…) | Click Retry |
| No speech detected | The media contains no usable voice | AI generation unavailable — switch to manual entry |
| AI chapter generation | The analysis is done, the AI is ready | Click Generate |
Start the generation
Once the “AI generation” state is reached, click Generate. A modal opens:
- Generation in progress: the AI analyzes the transcription to identify the relevant chapters (a few seconds)
- Preview of the generated chapters: the modal shows the list with each chapter’s number, timecode and title
- Choose how to apply them:
- Add to existing: keeps the chapters already in place and appends the generated ones
- Replace all: erases your existing chapters and replaces them with the generated ones
Confirm your choice: the chapters appear immediately in the list, where you can adjust them (titles, timecodes) before saving.
Tip: AI generation is an excellent starting point, not the finished job. Always review the titles and adjust them to match your tone (the AI sometimes produces titles that are too generic, along the lines of “Discussion of the topic”).
Step 4: Import a list from the clipboard
If you have already prepared your chapters in a text editor or a spreadsheet, copy-paste import is the fastest method.
Expected format
One chapter per line, in this form:
00:00:00 - Introduction
00:02:30 - First topic
00:15:00 - Conclusion
The separator between the timecode and the title is a dash surrounded by spaces. The timecode can be in HH:MM:SS format, or MM:SS for short videos.
How to do it
- Prepare your list in a text file or a spreadsheet, then copy it (Ctrl+C / Cmd+C)
- In the chapter editor, click Import from clipboard (the box at the bottom of the list)
- If you already have chapters, a confirmation box offers:
- Append: keeps the existing chapters and adds the new ones
- Replace all: erases the existing chapters and replaces them with the imported ones
- If the list is empty, the import runs straight away
- Save the change
Tip: this method is also handy for duplicating a chapter outline between similar videos (for example a series of short clips with the same structure). Copy the list from one video, adjust the timecodes, paste it into the next.
Step 5: Edit, reorder, delete
In the chapter list:
- Edit a timecode or a title: click in the matching field and type; the save bar appears at the bottom
- Delete a chapter: click the trash icon at the right of the row
- Reorder: change the timecodes to change the order — the list re-sorts itself chronologically when you save
All your edits are batched: as long as you have not clicked Save, you can discard every pending change in one click.
Step 6: Effect on the player
Once saved, chapters appear immediately in the Videas player, in several places:
- Markers on the progress bar: a small tick marks the start of each chapter. The viewer sees it when hovering over the timeline.
- Chapter tooltip: hovering over the progress bar shows the title of the current chapter
- Chapters panel: a dedicated button (bookmark icon) opens the full list, where the viewer can click a chapter to jump straight to it
- On videos with a transcription: chapters also act as the navigation structure in the transcription panel
See it in action: the Chapters and transcript demo illustrates all these interactions on the viewer’s side — particularly useful for showing your team the value of chapters.
Best practices
Not too many, not too few
- Short video (< 5 min): no chapters, or 2-3 at most
- Tutorial or training (5-30 min): one chapter every 2 to 5 minutes, i.e. 5-15 chapters over an hour
- Webinar or long interview (> 30 min): one chapter per topic, per speaker or per major stage
Clear, viewer-oriented titles
- Prefer “Set up SSO” over “Configuration”
- Add numbers for series: “Step 1 — Creating the account”
- Avoid internal titles: “Yves demo” will mean nothing to an outside viewer
Don’t forget the first chapter
Always place a chapter at 00:00:00 — typically “Introduction” or “Overview”. Otherwise the very start of the video has no marker, which can be disorienting.
Check after AI generation
AI generation is fast and impressive, but always review the titles before publishing. Ten seconds turn “The author explains the concept” into “Defining strong consistency” — your viewer finds their way much faster.
How many chapters does a video need?
It depends on the length. Under five minutes, two or three are enough — often none at all. On a tutorial or training video of five to thirty minutes, count on one chapter every two to five minutes, so five to fifteen chapters across an hour. Past thirty minutes, follow the real structure: one chapter per topic, per speaker or per major stage.
The measure that matters is not the count but the usefulness: a chapter should mark a point where someone would want to jump straight in.
Do I need a chapter at 00:00?
Yes, always. Without a marker at the very start, the opening of the video belongs to no chapter, and the navigation panel begins on nothing — which disorients the viewer.
Name it simply: Introduction, Overview, or whatever the first few minutes actually cover.
Should I review AI-generated chapters?
Yes, every time. Generation is an excellent starting point, not an end point: the AI regularly produces titles that are too generic — “The speaker explains the concept”, “Discussion of the topic” — which help nobody find their way.
Ten seconds of review turn “The speaker explains the concept” into “Defining strong consistency”. Take the chance to drop internal titles too: “Yves demo” is perfectly clear to your team and meaningless to an outside viewer.
What is the fastest way to chapter a series of videos?
Import from the clipboard. Prepare the list in a text editor or a spreadsheet, in the format 00:02:30 - Title — one chapter per line, hyphen surrounded by spaces — then paste it.
It is also the way to duplicate a template across similar videos: copy the list from one episode, adjust the timecodes, paste onto the next. On a series that always follows the same structure, it replaces manual entry entirely.
Why is AI generation unavailable on my video?
Because the audio analysis found no usable speech — the banner at the top of the tab says so explicitly. With no transcript, the AI has nothing to work from to cut the content up.
The banner distinguishes five states: Analysis required (Analyse button), Analysis in progress (wait a few minutes), Analysis failed (Retry button, often an unusual audio format), No speech detected (move to manual entry), and the ready state that shows Generate.
What happens if I generate when I already have chapters?
You choose. The preview that follows generation offers two options: Add to existing, which keeps your chapters and appends the generated ones, or Replace all, which wipes yours.
Either way, the chapters land in the list first, where you can adjust titles and timecodes — nothing is applied until you click Save.
In summary
- Chapters are managed from a media item’s Chapters tab in the media library
- Three complementary methods: manual entry, AI generation from the transcription, import from the clipboard
- AI generation goes through five states (analysis required, in progress, failed, no speech, ready) and offers a preview to confirm, with an Add or Replace choice
- Import uses the
HH:MM:SS - Titleformat, one chapter per line - For viewers, chapters appear on the timeline, in a tooltip and in a dedicated panel
- Plan on one chapter every 2-5 minutes for a training video, and take care with the titles
Related articles
Screenshots were taken on Videas Academy, an example channel built for this help center. It belongs to a fictional customer, not to Videas: your own channel carries your name, your branding and your prices.